You don’t need dirt to grow fresh herbs, fruits and vegetables. You don’t even need an outdoor garden. Gardening can be quite clean and compact with hydroponics. Let’s Look at the best hydroponic systems and setups for 2022. You can create a DIY version of it at home or purchase a professional hydroponic system.
In this post we’ll cover:
- What Is Hydroponics
- Types of Hydroponic Systems
- Wick System
- Deep Water Culture
- Ebb and Flow (Flood and Drain))
- Drip Systems
- Nutrient Film Technique
- Aeroponics
- What’s The Best Hydroponic Setup For 2022
- Best for DIY: Wick System
- Best for Budget: Deep Water Culture
- Traditional Approach
- Recirculating Deep Water Culture
- Materials Required for RDWC
- Creating the RDWC System: Steps to Follow
- Best for Commercial: Ebb and Flow
- Flood Tables
- Modular Ebb and Flow System
- Best for Large Plants: Drip System
- Material Required
- Procedure To Create A Drip System
Based on our 10 years of experience as a hydroponic nutrient supply company, we know and understand the growing requirements of plants. We know what makes the best hydroponic systems, making it possible to harvest loads without the hassle. Let’s dive in.

What Is Hydroponics?
Hydroponics is a form of soilless gardening, where plants grow in a nutrient-based solution instead of soil. There are several benefits of growing hydroponically. Plants grown in such a setup are proven to yield bigger harvests and faster. They use less space and water as compared to conventional gardening. With an indoor hydroponic setup, you have the liberty to grow and harvest your favorite crops all year round, without weather restrictions. It’s a good option for urban gardeners since they often have little or no gardening space at all.
Types Of Hydroponic Systems
Currently, there are 6 main types of hydroponics systems, including:
- Wick Systems
- Deep Water Culture
- Ebb and Flow (Flood and Drain)
- Drip Systems
- Nutrient Film Technique
- Aeroponics
Wick Systems
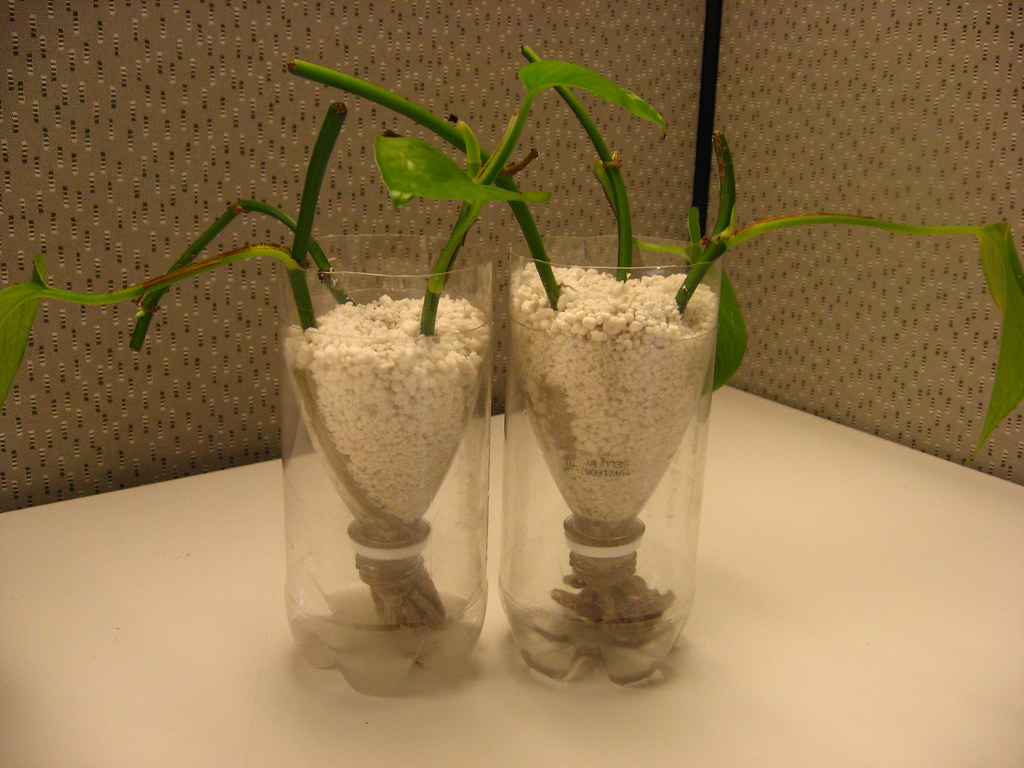
The wick system is the most basic form of hydroponic system, and is the one that most beginners looking to make a DIY setup at home will go for. Its simplicity lies in the fact that there are no electrical components or moving parts.
Plant roots are held by a growing medium, such as coconut coir, perlite or vermiculite. These mediums are light and can transport water and nutrients well. Nutrient-rich solution is transported through self-watering wicks from a water reservoir standing below the grow tray. Unless you have enough natural light reaching the system, you’ll also need to install fluorescent lights 12 inches above the plants. The wicks slowly absorb the liquid in the reservoir and move them into the root zone, nourishing the plants.
While it will work for microgreens and herbs, the wick system is not the ideal choice for thirsty plants, such as tomatoes, peppers and cucumbers.
Deep Water Culture

Deep Water Culture (DWC), also known as the Lettuce Raft system, is another easy setup that you can DIY at home. In a DWC system, plant roots are suspended into the nutrient solution reservoir. The plants are placed through a styrofoam floating platform such that the roots sit in the solution, while the green parts of the plants are exposed above the solution. The setup is much like a raft floating on water. Additionally, include an air pump to oxygenate the reservoir and prevent the roots from drowning.
This method is best suited to growing leaf lettuce since they have high water requirements, but few other plants perform well with this approach. Larger plants, and those that require a long growing period aren’t suitable for growing in DWC.
Ebb and Flow System (Flood and Drain)
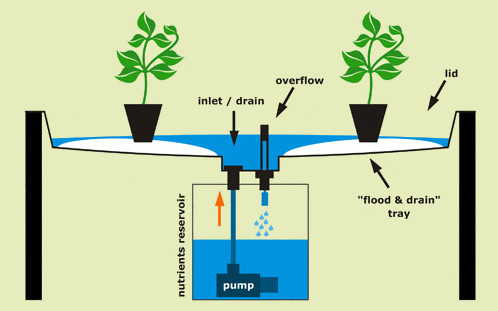
Ebb and Flow, also called Flood and Drain, is one of the best hydroponic systems out there. Though it’s a bit more sophisticated than the wick system and DWC, it’s versatile and works well for a variety of plant types. Unlike the DWC system, it does not expose the plant roots to water continuously.
It will instead flood the root zone with water and drain it on prescribed intervals. The periods during which the root zone has no water will promote the roots to grow deeper down in search of water. The ebb and flow system is most suited to crops that require the growing medium to dry out between waterings for optimal growth.
Drip Systems
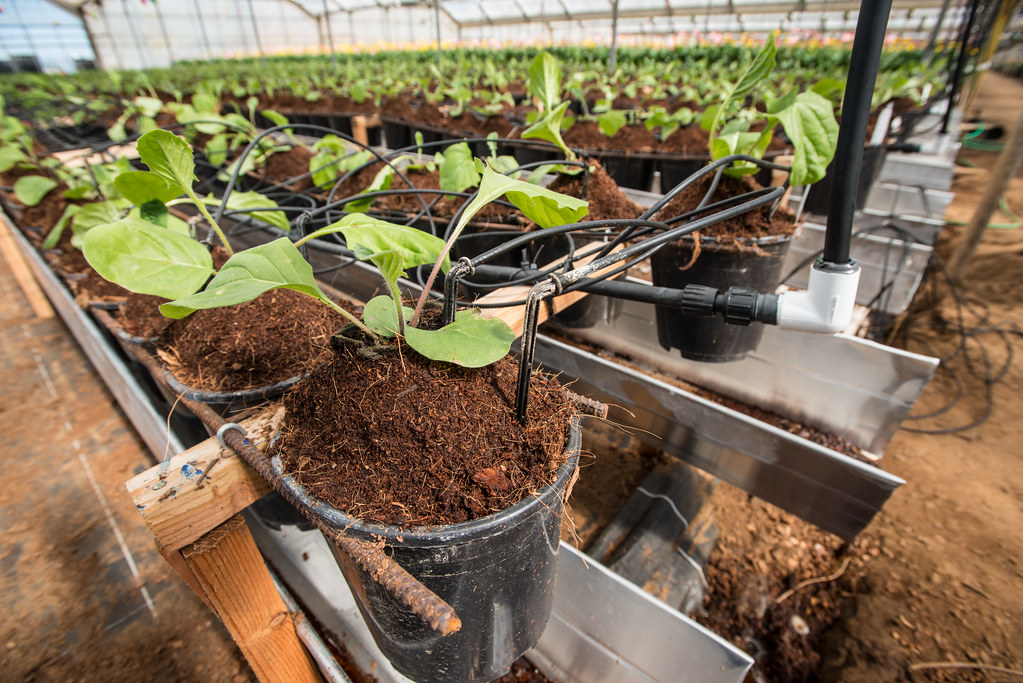
Drip systems are becoming increasingly common in commercial setups for their efficient use of water and high control over watering and feeding schedule of plants. The setup involves the nutrient solution being pumped through tubes from a water reservoir onto the growing medium of the plants to reach the roots. The dripping frequency can be adjusted according to the specific requirements of the plants.
There will be a nutrient pump, to pump nutrient solution through the tubes. An overflow drain is required at the bottom of the grow tray to drain out excess water back into the reservoir. An air pump is optional, and can be included in the water reservoir to oxygenate the roots and ensure optimal growth.
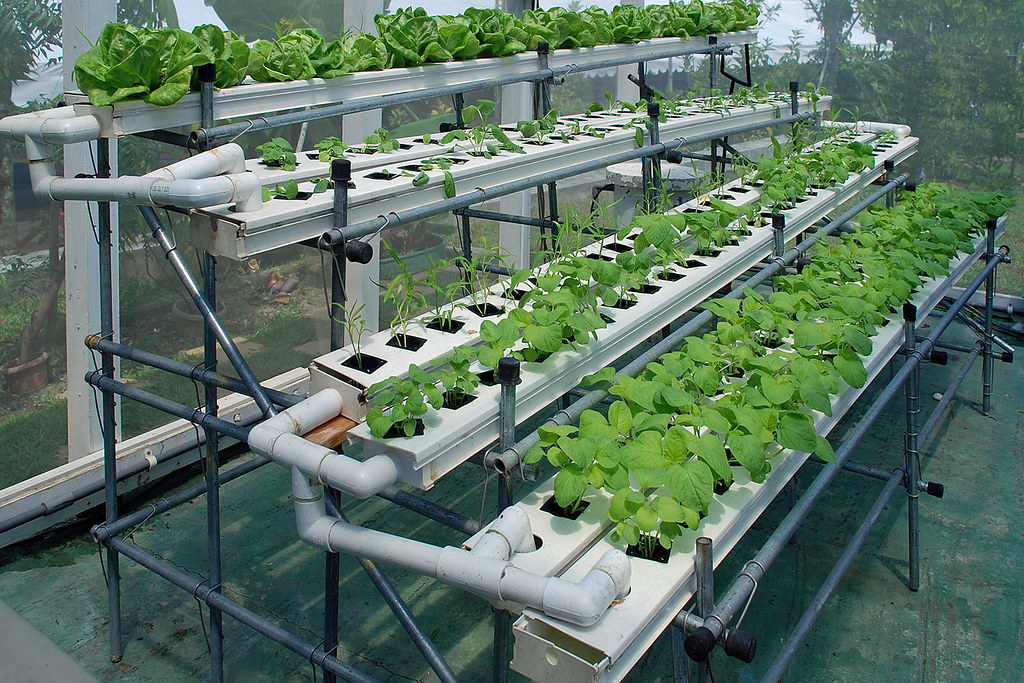
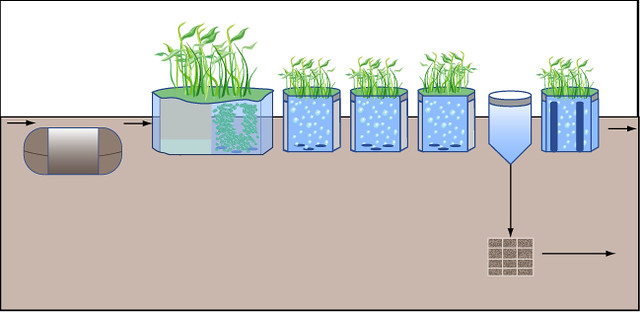
Nutrient Film Technique

The Nutrient Film Technique is another popular hydroponic system used in commercial setups. Plants are grown in channels that are slightly angled to allow the nutrient solution entering from one end to drain out of an overflow drain at the other end. The drained water goes back into the water reservoir sitting below the angled grow tray. A nutrient pump is needed to pump the solution through a tube into the higher end of the grow tray. An air pump is optional, but will ensure the optimal supply of oxygen to the roots.
Unlike the DWC, the root zone is not submerged in water with an NFT system. Instead, water flows in the form of a thin film through the tips of the roots. A bigger portion of the root zone is exposed to air, ensuring high oxygen levels, and eliminating the risks of drowning.
Aeroponic System

Aeroponic systems are considered the most advanced form of hydroponics where the plant roots are exposed to air and misted with nutrient solution at specific intervals. Though it requires sophisticated electrical equipment with pumps, misters and timers, the technique is an effective one. Though it’s an expensive system to set up, you can make it cost-effective by increasing the output, and that’s exactly where Humboldts Secret nutrient solutions can help you. Other than the base nutrients, Flower Stacker aims at boosting blooming to increase yields.
Aeroponics uses less water than the other hydroponic systems. A mister nozzle sprays nutrient-rich solution onto the roots of the plants suspended in air above the reservoir. The mist can either be sprayed continuously or at intervals using a timer. The interval can be adjusted depending on the specific requirements of the plants. Since the plant roots are suspended in air, they have plenty of oxygen available to grow.
What’s The Best Hydroponic System for 2022?
The best hydroponic setup really depends on your specific use case. Different hydroponic techniques have their own pros and cons. You can also create a customized system by combining the techniques of two or more hydroponic systems. Commercial growers often use customized systems by making certain adjustments to the standard method to acquire certain characteristics of the overall system.
Some of the best choices for specific use cases include:
Best for DIY: Wick Systems

If you want to experiment building a hydroponic system at home as a small-scale DIY project, Wick System is the easiest method to start with. A basic hydroponic wick system is made up of the following components:
- Growing container
- Grow medium
- Reservoir holding the nutrient solution
- Wicks
It works well for smaller cultivations, particularly non-fruiting ones. Microgreens, herbs and lettuce will grow well in the system.
Here’s how to build a wick system:
- You’ll need all of the basic components listed above.
- For the growing container, you can either use a grow tray specialized for hydroponic growing, or use a simple bucket or plastic tub which may already be available at home.
- Cut small slits at the base of the growing container to allow wicks to pass through.
- For the reservoir, choose a large container without the lid since one end of each of the wicks will be suspended in the solution. Choose a colored container that doesn’t allow light in to prevent algae growth.
- Situate the reservoir just under the growing container so the wicks only have to carry water a little distance.
- Insert one end of the wicks from the bottom of the growing container into the slits of the base. You can use felt, nylon, wool or a different synthetic material for the wick. You should have two wicks per plant.
- Fill the growing medium in the growing containers, half way through. The growing medium can be any material that absorbs and retains water well. Coco coir, perlite and vermiculite are all good options.
- Place the plant roots over the growing medium and add more growing medium to cover the roots.
- You can also add an air pump to the setup to pump air into the reservoir to oxygenate the roots and help them grow better.
Best for Budget: Deep Water Culture
One of the simplest hydroponic systems available is the deep water culture system. It’s simple to set up and since there are only a few components and moving parts involved, it’s also budget friendly. Maintenance is simpler and cheaper than other more sophisticated systems.
You can either make a DIY one at home, or purchase a professional one. Either way, the setup and maintenance is much cheaper than other systems.
Traditional Approach

Traditional approach is the easiest one you can start with if you have a small setup and don’t want to invest in anything fancy. Here’s what you’ll need:
- Water tank
- Growing medium
- Humboldts Secret Starter Kit
- Net pots
- Air pump or air stone
- Styrofoam
Here’s how to put them together to get the system going:
- Fill the water tank with the nutrient-based solution. You’ll need to mix water with the nutrient solution according to the package instructions to fill the tank with it.
- Include an air pump in the water reservoir to oxygenate the roots.
- Fill the growing medium in the net pots.
- If you’re growing from seeds, plant the seeds just below the surface of the growing medium. If you’re starting from seedlings, plant them such that the roots are covered by the growing medium and the green tops are exposed above it.
- Embed the plant pots at some intervals on a styrofoam platform.
- Suspend the styrofoam over the water in the reservoir, such that the growing medium is above the water. The green tops will be exposed in air above the system.
- As the seeds sprout, and seedlings grow bigger, the roots will reach the nutrient solution below it and you’ll see a faster growth from this point onwards.
Recirculating Deep Water Culture
The traditional design is a good option for beginners who are looking for a low-cost investment. However, if you want to scale it higher, you can go for a bit more sophisticated recirculating DWC.
As an advanced form of a simple DWC system, the recirculating DWC system (RDWC) includes a central reservoir that nourishes multiple plant pots connected through pipes. With shared resources, including water, nutrients and reservoirs, you are able to grow many plants at a time.
You can get a pre-made RDWC from an online store or make it yourself, as a cheaper alternative. The good thing about a purchased system is that it won’t fail you. It’s especially recommended if you’re growing an expensive crop that you can’t afford a loss in. If just trying out an experimental system, you can go ahead with the DIY approach.
Material Required For RDWC
To setup your own RDWC system, here’s what you’ll need:
- A water tank
- Air pump or air stone and tubing
- Nutrient pump
- Grow buckets (size should be identical to the water tank)
The grow buckets should have a bulkhead fitting at the base to allow the nutrient solution to pass through between the grow buckets and the central tank. Each grow bucket will also need a mesh basket to hold the growing medium and plant roots.
Creating the RDWC System: Steps To Follow
Whether you’re using a professional system you ordered online or making one from scratch at home, the concept will be the same. Here’s how to set up a RDWC system:
- Mix the essential nutrients from the Starter Kit with water in the reservoir according to the required amounts.
- Plant the seedlings in a growing medium of choice filled in each of the baskets.
- Suspend the basket in the grow bucket with the roots touching the liquid.
- Install the air stone with air tubing and air pump to the central reservoir to oxygenate the water.
- You’ll start seeing the seedlings put on growth within a day or two.
Best for Commercial: Ebb and Flow
Ebb and Flow system is the hydroponic system of choice for many commercial growers, thanks to its simplicity and effectiveness. Though it’s not the easiest to put together, hobbyists can also use it at home.
There are different designs you can set up for the technique. Each one will use the same basic concept, which includes following the grow tray and then draining it to introduce a dry period, promoting downward spreading of roots. These systems are ideal for vegetative stage transplants.
The popular types of ebb and flow system include Flood Tables and a Modular Ebb and Flow System:
Flood Tables
The flood table design includes a single “flood table” placed a small distance over the water reservoir. The plants are grown in individual buckets filled with growing medium and suspended into the flood tray. The reservoir pumps nutrient water into the flood tray from one end and an overflow drain moves it back into the reservoir from the other end.
Modular Ebb and Flow Systems
Instead of a single flood table as was the case with the flood tables, this one uses individual planting spots, typically buckets, connected through water pipes positioned at the same level. Water is pumped into the pipes through the nutrient pump in the central bucket. Since the buckets are typically sitting on the base of the growing system, gravity won’t help drain water out from the growing buckets. A second pump located in the central water tank will pull the nutrient solution back into the reservoir.
Best for Large Plants: Drip System
Drip system is another one of the commercially viable options, especially for plants that grow large. Large plants require larger quantities of growing medium around them to hold water for longer periods. Drip system ensures that despite the slow watering frequency, the growing medium can retain water for longer. For this reason, the drip system works well with a slow draining medium, such as peat moss, coconut coir, or rockwool.
With better control over the watering schedule of plants, the drip system works well for a variety of crops, including lettuce, onions, leeks, melons, tomatoes, radishes, cucumbers and more.
Material Required
To set up a drip system, here’s what you’ll need:
- Drip emitters (one for each plant)
- Thin tubing
- PVC pipes (to carry water from the reservoir to the emitters)
- Nutrient pump
- Grow tray
- A large bucket (reservoir)
- Timer (to adjust the dripping frequency)
- Growing medium
Procedure To Create A Drip Systems

- Prepare the plant pots by filling in the growing medium and planting the seedling. Make sure they have drainage holes.
- Place the nutrient pump inside the large bucket.
- Connect the pump to the emitters using PVC tubing and thin tubing.
- Embed the drip emitters into the growing medium of the plants.
- Place the plant pots in the grow tray.
- Include an overflow drain at the base of the grow tray that drains excess water back into the reservoir.
- The reservoir should be under the grow tray for excess water to flow out through gravity. If the reservoir is at the same height or higher than the grow tray, you’ll need to include an additional pump to pump excess water back in.
- Include a timer to the power source of the nutrient pump. You can adjust it to run for say, 5 minutes three times a day. Different plants have different watering requirements.
- Mix the base nutrients from Humboldts Secret Starter Kit in water in the ratio mentioned on the package to get the system running.

Conclusion
So are you ready to take your gardening skills to the next level with hydroponics?
Regardless of which type of hydroponic setup you choose to go with, the one thing you need to be particular about are the nutrients. It’s the one factor that can make or break your hydroponic harvest.
Humboldts Secret has been serving 100,000 happy customers on a regular basis. Our nutrient products are designed for producing healthier crops that yield bigger and better in little time.
Connect with us today and we’ll talk out the best hydroponic plan for you.
0 comments